Grooming Tool Cleaning Between Uses: Combs, Foils and Dry Storage
Beard trimmers, electric shavers and multi-grooming kits make personal grooming more convenient. However, their cutting heads, comb attachments and small internal spaces can collect hair, skin flakes, oils and leftover grooming products after repeated use.
A device that looks clean from the outside may still contain loose hair beneath a removable attachment.
Over time, neglected cleaning can affect how smoothly a grooming tool operates. Accumulated debris may interfere with moving components, while inappropriate washing or storage can damage parts that were never designed to come into contact with water.
Learning how to clean grooming tools properly is therefore an important part of personal care and equipment maintenance.
But there is one essential distinction: not every electric grooming device is waterproof, and not every removable attachment can be cleaned using the same method.
A foil shaver may require particularly careful handling because its outer foil is delicate. A beard trimmer may include removable combs that can be washed separately. A waterproof grooming device may permit rinsing under a tap, while another model may require dry brushing only.
The correct approach depends on the manufacturer’s instructions.
This guide explains how to remove loose hair safely, interpret washable and waterproof labels, care for foil heads and trimming combs, dry equipment thoroughly, store accessories and recognize when worn parts need replacement.
Why Cleaning Directions Depend on the Model
Grooming tools may look similar, but their internal construction can differ substantially.
A basic beard trimmer typically uses a moving cutting element and a stationary blade to trim hair to a selected length.
A foil shaver uses a thin perforated foil and an internal cutting mechanism to remove hair close to the skin.
Multi-grooming kits may include several interchangeable attachments for different grooming tasks.
Products such as hybrid trimming-and-shaving systems can use yet another cutting-head design.
These differences influence how the equipment should be cleaned.
Different cutting systems have different maintenance needs
A beard trimmer may collect hair between blade teeth and inside the removable comb.
A foil shaver can accumulate short hair beneath its foil cassette.
A nose-hair trimmer may have a small, enclosed cutting assembly.
A multi-groomer may use a combination of these attachments.
Although removing loose hair is a common maintenance goal, the cleaning process is not necessarily identical.
Some blades can be detached using a designated release mechanism.
Other cutting assemblies should remain intact and only be cleaned in the manner described by the manufacturer.
Never assume that a component is intended to be removed simply because it appears to have a visible seam.
Why the instruction manual matters
The owner’s manual usually identifies the cleaning methods permitted for the device.
It may explain:
- Whether the main handle can contact water.
- Which cutting heads can be removed.
- Whether the attachments may be rinsed.
- Which cleaning brush should be used.
- Whether blade lubrication is required.
- How components should be dried.
- How and when replacement parts should be fitted.
These instructions are particularly important for electric grooming devices because water exposure and improper disassembly can cause damage.
Philips, for example, provides different cleaning instructions for washable, showerproof and non-washable grooming products.
The differences are not merely cosmetic.
A non-washable trimmer should not be rinsed under a tap simply because a different trimmer from the same brand allows it.
What if the instruction manual is missing?
Check the product model number on the handle, packaging or purchase records.
Many manufacturers publish digital manuals and support articles.
Search the manufacturer’s official support website using the exact model identifier.
Avoid relying on a video demonstrating a visually similar but different product.
If you cannot confirm whether the device is washable, do not immerse or rinse the electrical handle.
Use only safe exterior cleaning consistent with available instructions, or contact the manufacturer for clarification.
Removing Loose Hair Without Damaging Blades
Loose hair is one of the most common types of debris found in grooming tools.
Removing it regularly can help keep cutting assemblies clear and make more thorough cleaning easier.
However, blades and foil surfaces can be damaged by forceful handling.
Begin by switching the device off
Before routine cleaning, turn the grooming device off.
Disconnect it from the charging cable or power supply.
Remove the battery only if the manufacturer specifically instructs you to do so.
Never handle exposed cutting components while an electrical device is unexpectedly operating.
Certain washable products have special powered-cleaning modes, but these should be used only when explicitly described in the manufacturer’s instructions.
Remove attachments correctly
Many trimmers include removable length-adjustment combs.
Some have clip-on attachments, while others use sliding or locking mechanisms.
Follow the correct release procedure.
Do not twist, bend or pry an attachment away from the handle if it does not release easily.
Forcing a plastic attachment may damage its clips or affect how securely it fits during the next grooming session.
Use the supplied cleaning brush
Many electric trimmers include a small brush designed to remove hair from accessible spaces.
Use this tool gently where the manufacturer permits.
For example, you may be instructed to brush hair from the trimming teeth or the space beneath a detachable cutting head.
Do not press the brush into delicate foil surfaces unless the manufacturer explicitly allows it.
A foil and a conventional trimmer blade are not equally resistant to mechanical contact.
Avoid sharp objects
Do not use needles, knives, metal picks or tweezers to dig hair from the cutting mechanism.
Philips specifically advises against using sharp objects such as tweezers to clean certain OneBlade products.
These objects may deform the blade, damage protective parts or create an injury risk.
If hair cannot be removed using the recommended brush or approved rinsing method, consult the manufacturer’s cleaning instructions rather than increasing force.
Do not bang the device against a sink
Tapping a trimmer or shaver against a hard surface may seem like a quick way to remove hair.
However, repeated impacts can damage cutting components or the device housing.
Philips specifically warns against striking OneBlade handles against sinks or other hard surfaces.
Instead, remove debris using the recommended cleaning method.
A few extra moments spent cleaning gently are preferable to damaging a precision cutting assembly.
Waterproof Versus Washable: Reading the Manual
The terms waterproof, washable and water-resistant are frequently used in grooming-product descriptions.
However, they should not be treated as interchangeable.
The exact meaning depends on the product’s design and manufacturer’s specifications.
Non-washable grooming devices
A non-washable device is not intended to be cleaned using running water.
For some Philips products, a crossed-out tap symbol indicates that the device should be cleaned without water.
The recommended process may involve removing an approved attachment and using a small cleaning brush or cotton swab.
Do not place a non-washable trimmer under a tap.
Do not immerse the handle.
Water entering an electrical device can damage internal components and create safety problems.
Washable grooming devices
Some grooming tools are designed to be cleaned with water.
A tap symbol may indicate that rinsing is permitted for the relevant device or removable components.
However, a washable designation does not automatically mean the product is suitable for use in the shower.
Philips distinguishes between groomers that can be rinsed and devices designed for shower use.
Certain washable products must not be immersed, even though their cutting heads or other specified components can be cleaned under running water.
Always follow the particular model’s instructions.
Showerproof or wet-and-dry devices
A shower or bath symbol may indicate that the product is designed for wet use.
For compatible devices, the manufacturer may permit grooming while showering and cleaning under running water.
However, there may be restrictions concerning charging cables and electrical connections.
Some waterproof grooming devices are designed to operate only when disconnected from their power supply.
Never assume that a wet-and-dry device is safe to operate while plugged in.
Can washable attachments be rinsed when the handle is not washable?
Sometimes, yes.
Certain grooming devices have removable attachments that can be washed separately even though the main handle must remain dry.
This distinction is important.
Remove only the components the manufacturer permits you to detach.
Wash them according to their instructions.
Allow them to dry completely before reattaching them if the manual requires it.
Keep the non-washable handle away from running water.
Understanding common symbols
| Symbol or label | General meaning | Important precaution |
|---|---|---|
| Crossed-out tap | Device should not be rinsed | Use approved dry cleaning only |
| Tap symbol | Water cleaning may be permitted | Check whether this applies to the whole device or selected parts |
| Shower or bath symbol | Product may support wet or shower use | Follow cordless-use and charging restrictions |
| Cleaning reminder | Device requires routine cleaning | Follow the model-specific procedure |
| Oil-drop symbol | Blade lubrication may be required | Use approved lubricant and instructions |
These are common examples found on certain manufacturers’ products, not universal symbols that replace an owner’s manual.
If the meaning of a symbol is unclear, verify it through official support.
Foil and Comb Care After a Grooming Session
Foil shavers and trimming combs require different handling.
A foil is a precision component that can be damaged by bending or excessive pressure.
A removable plastic comb is generally more robust, but its teeth and fastening clips can still break.
Why foil shavers need gentle cleaning
A foil shaver uses a thin outer foil with tiny openings.
Hair enters these openings and is cut by the internal mechanism.
Because the foil is relatively thin, it may become dented or damaged if handled incorrectly.
A damaged foil may no longer glide comfortably across the skin.
It can also affect the cutting mechanism’s intended operation.
Do not scrub a delicate foil with a stiff brush unless the manufacturer specifically recommends doing so.
Avoid pressing it against hard surfaces.
Removing a foil cassette
Some shavers allow users to release the foil cassette or cutting head as a complete assembly.
Others have a different maintenance arrangement.
Follow the manufacturer’s release instructions.
Do not force apart components that are not intended for routine user disassembly.
Once the approved part has been removed, clean it using the appropriate procedure.
For a washable shaver, this may involve rinsing.
For a dry-clean-only model, a soft brush may be recommended for specific areas.
Do not mix cleaning instructions across brands
For some Panasonic shavers, official instructions permit particular cleaning modes using water and designated cleaning agents.
Other products prohibit those methods.
A cleaning process recommended for one Panasonic model should not automatically be applied to a Braun, Philips or unrelated device.
Even models from the same manufacturer may differ.
The manufacturer’s directions are the controlling reference.
Cleaning removable trimming combs
Trimming combs help control how much hair remains after cutting.
Hair and grooming residue can collect between their teeth.
If a comb is approved for washing, remove it and rinse it as instructed.
If the manual recommends brushing only, use the designated dry-cleaning method.
Pay attention to the spaces between the teeth and around the attachment clips.
After cleaning, allow the comb to dry appropriately before storage or reattachment.
Inspecting comb teeth
Before using an attachment again, check for:
- Missing teeth.
- Cracked plastic.
- Sharp edges.
- Deformed guides.
- Loose attachment clips.
Damaged combs may no longer guide hair as intended.
A broken or sharp edge could also catch on the skin.
Replace damaged attachments using compatible parts.
Do not use glue or improvised repairs on components that need to fit securely against a moving cutting system.
Cleaning a OneBlade-Style Grooming Tool
Hybrid trimming and shaving tools often use distinctive blade designs.
Their maintenance needs should be considered separately from traditional foil shavers and ordinary beard trimmers.
Philips provides specific guidance for its OneBlade products.
Follow the approved rinsing procedure
For supported Philips OneBlade models, the manufacturer recommends cleaning after each use.
Its instructions describe removing attachments, clearing loose hair, rinsing the blade and handle with lukewarm water, and rinsing attachments separately.
Certain instructions involve operating the device during rinsing.
Do not apply that powered-rinsing procedure to other grooming tools unless their manufacturer specifically permits it.
For any device, follow the exact steps in its official manual.
Do not rub the blade with a towel
Philips advises allowing OneBlade components to air dry rather than wiping the blade with a towel or tissue.
The manufacturer also warns against using sharp objects to remove trapped hair.
These precautions help avoid unnecessary blade damage.
They are not a universal cleaning rule for every type of grooming equipment.
Some other devices permit a soft cloth on particular exterior surfaces.
Always distinguish the cutting element from the surrounding housing.
Keep attachments organized
A hybrid grooming kit may contain several guards and combs.
Different attachments may be intended for facial hair, body hair or sensitive areas.
Do not assume all attachments serve the same function.
Philips advises against using the same comb on the face and other body areas for hygienic reasons in its OneBlade body-grooming guidance.
Keeping dedicated attachments separate and identifiable can support more hygienic use.
When should the blade be replaced?
Replace a blade according to the manufacturer’s instructions, including any wear indicator, recommended interval or observed deterioration.
The appropriate replacement timing varies with model, frequency of use and blade condition.
Do not apply one product’s advertised blade life to unrelated shavers or trimmers.
A blade that is damaged or no longer functions correctly may need attention earlier than a routine replacement reminder.
Drying, Storage and Accessory Organization
Cleaning is only part of grooming-tool care.
How the device is dried and stored also matters.
A clean attachment left wet inside a closed pouch can create avoidable maintenance problems.
Allow removable parts to dry
After approved water cleaning, remove excess moisture in the manner specified by the manufacturer.
Some instructions recommend shaking off water gently.
Others direct users to pat certain external surfaces dry.
Delicate cutting foils or blades may require air drying without towel contact.
Follow the specific directions.
Do not assume every cutting part can be wiped, shaken or dried using the same technique.
Do not use excessive heat
Avoid using a hair dryer, room heater or another strong heat source to speed up drying unless the manufacturer explicitly permits it.
Heat may affect plastic components, adhesives, seals or other materials.
A clean, ventilated location is generally more appropriate for components intended to air dry.
Keep electrical parts and charging accessories away from water.
Avoid trapping moisture
Do not place damp attachments directly into a closed storage pouch for long periods.
Allow the cleaned components to dry as directed before putting them away.
Some devices have protective caps or stands designed for storage.
Use these accessories according to the manufacturer’s instructions.
Protect cutting heads
A protective cap can help shield blades and foils from accidental contact with other objects.
Philips recommends storing certain groomers with an appropriate comb or protective cap attached.
Avoid keeping exposed cutting heads in a drawer alongside keys, metal tools or other hard objects.
Do not store equipment in a way that places pressure on delicate foils.
Store attachments together
Multi-grooming kits may include several small components.
Keeping them in an organized case reduces the chance of losing an attachment or substituting an incorrect part.
A simple arrangement might separate:
- Cutting heads.
- Length-adjustment combs.
- Body-grooming accessories.
- Cleaning brush.
- Approved lubricant.
- Charger and cable.
Keep the storage area dry and consistent with the manufacturer’s environmental requirements.
Bathroom storage
Bathrooms can experience humidity and temperature changes.
If your bathroom remains damp after showers, consider a drier storage location, particularly for equipment not designed for prolonged moisture exposure.
A waterproof device is not automatically intended to remain wet indefinitely.
For products with charging stands, follow the placement and electrical safety requirements in the manual.
Travel storage
Before packing a grooming device, make sure it is clean, dry and switched off.
If it has a travel lock, activate it according to the manufacturer’s instructions.
Use a protective cap or suitable case.
Avoid placing a delicate foil head where other luggage contents may crush it.
For rechargeable devices, follow applicable battery and transport requirements.
Do not travel with loose blades or accessories in a configuration that creates injury risks.
Cleaning Versus Disinfecting: Understanding the Difference
Cleaning and disinfecting serve different purposes.
Cleaning removes visible dirt, hair, oils and other material from surfaces.
Disinfection uses an appropriate process or product to reduce specified microorganisms.
A grooming tool being visibly clean does not establish that it is sterile.
Similarly, spraying a surface with a chemical does not guarantee appropriate disinfection if the product is unsuitable or its instructions are not followed.
Routine personal grooming
For a personal electric trimmer or shaver, routine cleaning according to the manufacturer’s instructions is the starting point.
Do not add strong disinfectants automatically.
Some cleaning chemicals can damage blade coatings, lubricants, plastics or electrical components.
If the manufacturer provides an approved disinfection procedure, follow it.
Should you spray alcohol on a shaver?
Do not assume alcohol is suitable for every grooming device.
Panasonic cautions against certain alcohols and solvents for some shaver models, while other manufacturers may specify different compatible cleaning products.
A chemical that works on a removable plastic comb may not be appropriate for a foil cassette or charging contact.
Check the exact device manual.
Do not spray liquids into charging ports, motors or other openings unless expressly permitted.
Can boiling water sterilize attachments?
Do not boil grooming components unless the manufacturer specifically authorizes that procedure.
Boiling may deform plastics, affect seals or damage cutting assemblies.
Ordinary consumer trimmer attachments are not automatically designed for heat sterilization.
What about UV cleaning devices?
Some grooming systems offer manufacturer-compatible UV cleaning accessories.
However, a UV device is not a universal substitute for removing hair and other debris.
Philips notes that certain compatible UV accessories are intended to supplement, not replace, regular cleaning.
Avoid assuming that a general-purpose UV box makes every tool sterile or safe to share.
Effectiveness depends on device design, exposure and validated performance.
Why Personal Grooming Tools Should Not Be Shared Casually
Razors and other grooming items may contact skin, small cuts or blood.
Sharing these tools can create hygiene risks.
The CDC advises against sharing personal items such as razors and towels to reduce the risk of certain infections, including MRSA.
It also identifies shared razors as a possible route for blood exposure relevant to hepatitis C transmission.
This does not mean every shared grooming tool causes an infection.
It means personal-use precautions are sensible.
Keep your own shaving tools
Where practical, use your own razors and shaving heads.
Avoid casually sharing cutting attachments between household members.
This is particularly important when devices have contacted broken skin, cuts or inflamed areas.
Facial and body grooming attachments
Some devices are designed for both facial and body grooming.
The manufacturer may provide separate attachments for different areas.
Follow those instructions.
Keeping accessories dedicated to their intended purpose can reduce unnecessary cross-use.
What if someone else uses your device?
Do not assume a quick brush-off establishes that the tool is suitable for another person.
If the equipment is designed for shared or professional use, it requires an appropriate hygiene protocol, compatible cleaning methods and any relevant regulatory requirements.
For ordinary personal grooming equipment, limiting use to one person is a practical approach.
Professional grooming environments
Barbershops and salons may use professional equipment designed for repeated client use.
These environments can have different hygiene and disinfection requirements from household grooming.
Do not assume that the cleaning instructions for a personal trimmer are sufficient for professional multi-client use.
Professionals should follow applicable local requirements and the equipment manufacturer’s validated procedures.
Avoid grooming directly over irritated or infected skin
If you have open cuts, painful sores, significant inflammation or a suspected skin infection, avoid unnecessary grooming over the affected area.
Grooming equipment can irritate already compromised skin.
Seek healthcare advice when symptoms persist or worsen.
Do not try to resolve a suspected infection simply by cleaning the trimmer more frequently.
Blade Lubrication: When Oil Is Required
Some grooming tools require periodic blade lubrication.
Other devices use cutting systems that are designed for different maintenance procedures.
There is no universal rule that every shaver or trimmer should receive oil after every use.
Why lubrication may matter
Certain moving cutting components rely on an appropriate lubricant to reduce friction.
The manufacturer may provide oil in the original package or identify a suitable product.
Philips includes oiling guidance for specific groomers and displays an oil-drop reminder on some models.
However, maintenance intervals vary.
Do not use random household oils
Cooking oils, fragranced oils, cosmetics and unrelated lubricants are not automatically suitable for electric cutting assemblies.
They may leave residue or behave differently from the intended product.
Use the lubricant specified or approved by the manufacturer.
Keep oil away from inappropriate parts
Apply lubricant only to the locations identified in the manual.
Do not add oil to electrical connections, charging ports or sealed mechanisms.
Using more oil than instructed is not necessarily beneficial.
Cleaning before lubrication
When lubrication is required, the manufacturer may instruct you to clean the cutting assembly first.
Follow the full sequence.
Do not apply oil to a visibly damaged blade in an attempt to compensate for deterioration.
A cutting component that is structurally damaged may require replacement rather than lubrication.
Replacing Damaged Heads or Worn Attachments
Cleaning can remove debris, but it cannot reverse every form of wear.
Cutting heads, foils, trimming combs and attachment clips may eventually need replacement.
Signs a foil may be damaged
Inspect the foil according to the manufacturer’s instructions.
Potential concerns include:
- Visible dents.
- Holes or tears.
- Bent sections.
- Unusual sharp edges.
- Damage affecting the head’s fit.
- Persistent discomfort associated with a visibly damaged component.
Do not continue shaving with a damaged foil.
A damaged component may contact the skin in an unintended way.
Replace it using the appropriate compatible part.
Trimmer blades that pull hair
If a trimmer begins pulling or snagging hair, first check whether routine cleaning has been performed correctly.
Loose hair or residue may interfere with operation.
However, pulling can also have other causes, including worn cutting components or inappropriate use.
If cleaning and approved maintenance do not resolve the problem, consult the manufacturer’s troubleshooting guidance.
Do not attempt to sharpen precision blades with improvised tools.
Cracked comb attachments
A comb with missing teeth, a broken guide or a damaged mounting clip may no longer maintain the intended cutting distance.
This can result in an uneven trim or accidental contact with the skin.
Replace the damaged attachment.
Do not rely on tape or glue to repair parts that must fit precisely against a moving blade.
Manufacturer replacement intervals
Some brands publish routine replacement recommendations for particular cutting systems.
For example, Philips provides model-specific guidance for replacing shaving heads.
These intervals should not be generalized to every manufacturer or grooming format.
Usage patterns, component condition and device instructions matter.
Check part compatibility
Replacement parts that look similar may not fit the same device.
Use the exact model number when selecting heads, foils, blades or combs.
Confirm compatibility through the manufacturer’s documentation or an authorized supplier.
An incompatible cutting head may not attach securely or function correctly.
When to replace the whole device
A damaged blade does not automatically mean you need a new electric groomer.
A replaceable cutting head may be sufficient when the handle and other components remain in good condition.
However, a device with electrical damage, an unsafe charging connection, a damaged housing or an unresolved mechanical fault may require authorized repair or replacement.
Do not continue using malfunctioning electrical equipment simply because its cutting head is still usable.
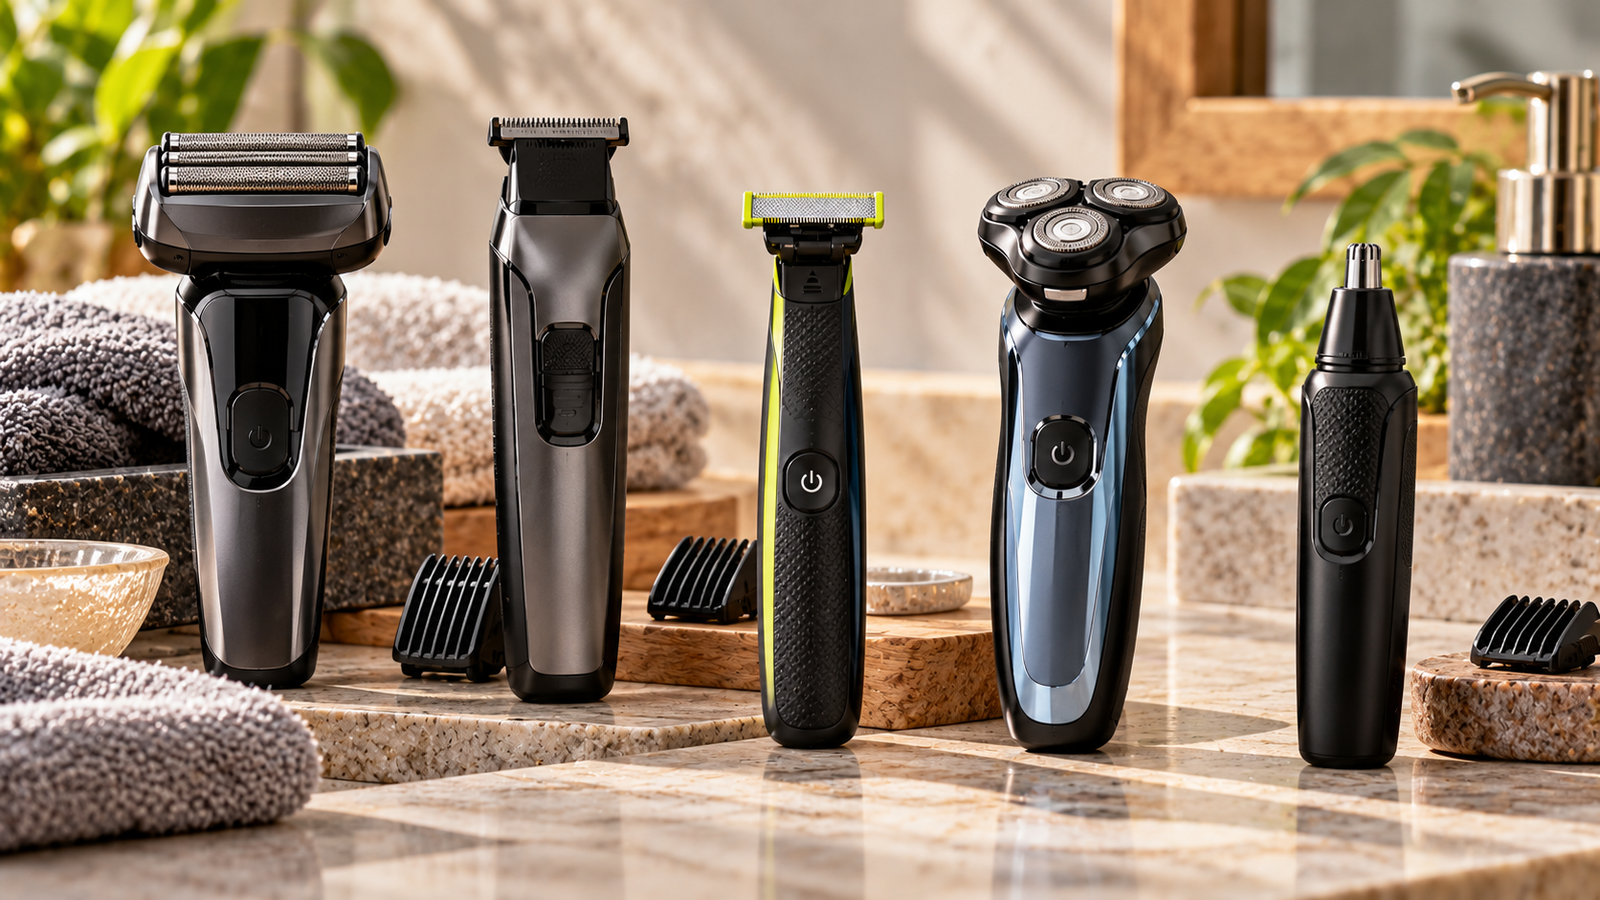
Cleaning Different Grooming Formats: A Practical Comparison
Different grooming formats have different maintenance priorities.
The following table provides general considerations.
| Grooming format | Common cleaning focus | Main precaution |
|---|---|---|
| Beard trimmer | Hair between blade teeth and inside combs | Check whether the head and handle are washable |
| Foil shaver | Hair beneath the foil cassette | Avoid bending or damaging the delicate foil |
| Multi-groomer | Several cutting heads and attachment combs | Follow instructions for each removable component |
| Hybrid blade groomer | Hair and residue around specialized blade surfaces | Do not scrape, strike or dismantle the blade |
| Nose or ear trimmer | Debris inside the small cutting assembly | Use only the approved cleaning and disassembly method |
| Body groomer | Hair, skin residue and body-specific attachments | Follow wet-use and hygiene instructions |
These are general maintenance distinctions.
Specific product instructions always take priority.
For a comparison of the tools themselves, read Physical Glow’s Foil Shaver vs Multi-Groomer vs OneBlade: Five Grooming Formats.
That article explains the different grooming roles and format choices.
This guide focuses on how to maintain these products once you own them.
A Simple After-Grooming Maintenance Routine
For many personal grooming tools, a short routine after each session can prevent unnecessary buildup.
The correct steps depend on the device, but the following framework can help you organize maintenance.
Step 1 — Turn the device off. Disconnect it from the power supply before cleaning unless its approved procedure explicitly requires a particular powered-cleaning mode.
Step 2 — Check the cleaning instructions. Confirm whether the device, head and attachments can be exposed to water.
Step 3 — Remove approved attachments. Release only those components designed for routine user removal.
Step 4 — Clear loose hair. Use the manufacturer-supplied brush or another approved method without scraping or striking the cutting components.
Step 5 — Clean washable parts where permitted. Follow the model-specific rinsing instructions. Keep non-washable handles dry.
Step 6 — Dry components correctly. Air dry delicate parts when required and avoid excessive heat.
Step 7 — Inspect the equipment. Look for bent foils, broken combs, loose clips, damaged blades and other signs of deterioration.
Step 8 — Lubricate only if instructed. Use an approved product at the recommended interval.
Step 9 — Reassemble correctly. Reattach dry components in the intended orientation.
Step 10 — Store safely. Protect the cutting head, keep accessories organized and avoid unnecessary moisture or heat exposure.
This routine does not authorize immersing a device, dismantling a sealed component or running a shaver under water.
Follow the manufacturer’s exact maintenance procedure.
Common Grooming Tool Cleaning Mistakes
Many maintenance problems result from treating all grooming devices as though they work the same way.
Mistake 1: Rinsing a non-washable handle
Not every electric trimmer is designed for water exposure.
A waterproof-looking plastic housing does not establish that the device is washable.
Mistake 2: Assuming a washable trimmer is showerproof
A product may permit cleaning under a tap while prohibiting shower use or immersion.
Check the manual and relevant symbols.
Mistake 3: Scrubbing delicate foil surfaces
Some shaver foils can be damaged by stiff brushes or pressure.
Use the approved method for the specific cutting head.
Mistake 4: Using sharp objects to remove trapped hair
Metal picks and tweezers may damage blades or create injury risks.
Use the manufacturer’s recommended brush or cleaning process.
Mistake 5: Reassembling parts while damp
Certain attachments require complete drying before reassembly.
Follow those instructions and avoid trapping moisture.
Mistake 6: Adding strong cleaning chemicals
Alcohol, bleach, solvents and other chemicals are not universally compatible with grooming devices.
Use only approved cleaning agents.
Mistake 7: Oiling every device automatically
Some cutters require lubrication, while others have different maintenance requirements.
Use the specified lubricant only when instructed.
Mistake 8: Ignoring broken attachment clips
A damaged comb or cutting head may fit incorrectly.
Replace compromised components rather than continuing to use them.
Mistake 9: Sharing personal shaving heads
Personal grooming tools can contact skin and blood.
Avoid sharing razors and similar personal items.
Mistake 10: Storing damp tools in a closed bag
Dry equipment according to the manufacturer’s directions before longer-term storage.
When Cleaning Is Not Enough
A grooming tool may require more than ordinary cleaning if it develops performance or safety problems.
The device becomes unusually noisy
A new grinding, rattling or irregular sound may indicate trapped debris or a mechanical problem.
Stop using the device and check the approved troubleshooting guidance.
Do not dismantle the motor or sealed housing.
The motor stops unexpectedly
Confirm that the device is charged and that the controls are being used correctly.
If the issue persists, consult the manufacturer.
Do not bypass safety switches or modify electrical connections.
The blade becomes unusually hot
Some warming during operation may occur, but excessive heat or discomfort should not be ignored.
Stop using the tool if it becomes abnormally hot.
Check the manufacturer’s guidance and seek authorized support if needed.
The charging port is damaged
Do not charge equipment with visibly damaged connectors, exposed wiring or other electrical faults.
Stop use and arrange proper assessment.
Avoid improvising repairs.
The shaver causes repeated cuts
If the tool begins causing repeated nicks or irritation, inspect the blade or foil condition and confirm that it is being used correctly.
Damaged cutting components may require replacement.
Persistent skin irritation can also have other causes.
If irritation, cuts or a rash continue, seek appropriate medical guidance.
Frequently Asked Questions
How do I clean grooming tools after use?
Turn the device off and follow its cleaning instructions.
Remove approved attachments, clear loose hair using the recommended method, rinse only the parts designed for water cleaning and dry the equipment as directed.
Do not assume the entire device can be washed.
Can I wash an electric beard trimmer with water?
Only when the manufacturer permits it.
Some trimmers are washable, some have washable attachments but non-washable handles, and others require dry cleaning.
Check the symbols and owner’s manual for the exact model.
What is the difference between washable and waterproof?
A washable device may permit particular water-cleaning procedures.
A waterproof or showerproof device may support additional water exposure, depending on its design.
Neither term should be interpreted without checking the manufacturer’s stated limitations.
Can I put a trimmer under running water?
Only if its instructions allow that procedure.
A tap symbol may indicate water cleaning on certain models, but it does not automatically authorize immersion or shower use.
How should I clean a non-washable trimmer?
Use the manufacturer’s approved dry-cleaning method.
This may involve removing an allowed attachment and brushing away hair using the supplied cleaning brush.
Keep the electrical handle dry.
Can I clean a foil shaver with a brush?
It depends on the shaver.
Some models permit brushing designated parts, while delicate foils may require other handling.
Do not scrub a foil unless the manufacturer explicitly instructs you to do so.
Should I remove the foil cassette after every shave?
Follow the manufacturer’s maintenance schedule.
Some products have removable cassettes intended for routine cleaning, while others use different mechanisms.
Do not force apart components that are not designed for regular removal.
Can I use soap to clean an electric shaver?
Only where the manufacturer permits it.
Some Panasonic shavers have specific soap-and-water cleaning procedures.
Other grooming devices prohibit detergents because they can affect protective lubrication or components.
Never assume one brand’s cleaning process applies to another.
Is alcohol safe for cleaning trimmer blades?
Not universally.
Some cleaning procedures may permit specified alcohol-based products, while other devices prohibit them.
Follow the exact manufacturer instructions.
Can I disinfect a trimmer with boiling water?
Do not boil an electric device or its parts unless the manufacturer explicitly permits that method.
Heat can damage plastics, seals and precision components.
Should I clean my trimmer after every use?
Many manufacturers recommend removing hair and cleaning their grooming products after each use.
Follow the schedule for your model.
Regular maintenance is generally easier than waiting for substantial buildup.
How do I clean grooming comb attachments?
Remove them according to the instructions.
Brush or rinse them using the permitted method.
Inspect the teeth and mounting clips, dry as required and reattach correctly.
Why does my trimmer pull hair after cleaning?
Possible causes include damaged or worn cutting components, incorrect assembly, insufficient approved maintenance or other mechanical problems.
Consult the manufacturer’s troubleshooting guidance if routine cleaning does not resolve the issue.
Should I oil my beard trimmer?
Only according to its maintenance instructions.
Some trimmers require periodic lubrication.
Use the lubricant and procedure recommended for the product.
Do not apply random household oils.
Can I dry an electric shaver using a hair dryer?
Avoid using external heat unless the manufacturer specifically permits it.
Some products require air drying.
Others may have compatible drying stations.
Follow the instructions for your device.
Can I put wet attachments back on the trimmer?
Some manufacturers instruct users to let parts dry completely before reassembly.
Follow the model-specific directions.
Do not trap water against non-washable electrical components.
How should I store a grooming kit?
Clean and dry the components as directed.
Use protective caps where supplied, keep accessories organized and avoid excessive heat or moisture.
Protect cutting heads from contact with hard or sharp objects.
Is it safe to share an electric shaver?
Avoid casually sharing personal shaving equipment.
Razors and similar tools may contact skin or blood, and public-health guidance recommends not sharing personal razors.
Should face and body trimmer attachments be separate?
Follow the manufacturer’s intended-use instructions.
Some products recommend dedicated attachments for different body areas for hygienic reasons.
Keeping accessories separate and identifiable can help prevent unintended cross-use.
Can I replace only the shaving head?
Often, yes, if the model is designed for replaceable heads.
Check part compatibility through the manufacturer’s official information.
Do not use an incompatible replacement simply because it looks similar.
When should a foil shaver head be replaced?
Follow the model-specific replacement recommendations and inspect for visible damage.
Bent, torn or otherwise compromised foils may need replacement sooner.
There is no universal interval suitable for every foil shaver.
What should I do if I accidentally rinse a non-washable trimmer?
Stop using it and disconnect it safely from power if possible without exposing yourself to electrical danger.
Do not attempt to turn it on repeatedly to test it.
Follow the manufacturer’s water-damage guidance or contact authorized service.
Do not charge a device that may contain water until it has been professionally assessed or the manufacturer confirms the appropriate procedure.
When should I replace the entire grooming device?
Consider authorized repair or replacement when the handle, motor, battery, charging system or another essential component is damaged or cannot operate safely.
Replaceable heads and combs may be changed separately when the device is otherwise functioning correctly.
Final Takeaway
Cleaning grooming tools is an important part of maintaining electric trimmers, foil shavers and multi-grooming kits.
However, there is no universal cleaning process suitable for every device.
The most important first step is identifying what your particular model allows.
A non-washable trimmer may require brushing only. A washable device may permit rinsing of specified components. A showerproof model may support additional water exposure, but electrical safety restrictions still apply.
Remove loose hair gently, avoid scraping delicate cutting surfaces and allow washed components to dry according to the manufacturer’s instructions.
Keep attachments organized, protect blades during storage and replace damaged heads or combs rather than attempting unsafe repairs.
For personal hygiene, avoid casually sharing razors and shaving heads.
The best grooming-tool maintenance routine is not the most aggressive cleaning method. It is the one that removes debris effectively while protecting the device, its cutting components and the person using it.
Physical Glow’s editorial principle: Grooming equipment care should follow verified manufacturer instructions, distinguish cleaning from disinfection and avoid recommendations that could expose electrical devices to unsafe water contact or damage precision blades.
References and Further Reading
- Philips — How Do I Clean My Philips Groomer?
- Philips — Can I Rinse My Philips Groomer With Water?
- Philips — How Do I Clean My Philips OneBlade?
- Panasonic — How to Clean and Apply Oil to a Shaver, Epilator, Trimmer or Body Groomer
- Philips — What Do the Symbols on My Philips Shaver Mean?
- CDC — Preventing MRSA
- CDC — Hepatitis C Prevention and Control